Theme Layout

[Rightsidebar]

Boxed or Wide or Framed

[Boxed]

Theme Translation

Display Featured Slider

No

Featured Slider Styles

Display Grid Slider

No

Grid Slider Styles

Display Trending Posts

No

Display Author Bio

No

Display Instagram Footer

Powered by Blogger.

Wednesday, December 24, 2014

Oatmeal Cranberry Chocolate Chip Cookies


While standing the check out line, I picked up a Southern Recipes magazine to look for ideas to bake desserts for our Christmas Eve dinner we are hosting. I came across quite a few that I will be trying but one stuck out to me the most because we have already been making them except without the chocolate chips.

The past few weeks Don, my brother-in-law, has been baking oatmeal cranberry bars. He got the original recipe off the Quaker Oats Old Fashion container. For our dinner, I knew we should try to combine both recipes to create a perfect Christmas dessert. The recipe makes about 4 dozen cookies.

Ingredients:
1 stick of butter
3/4 cup firmly packed brown sugar
1/2 cup granulated sugar
2 eggs
1 teaspoon vanilla extract
11/2 cups all-purpose flour
1 teaspoon cinnamon
3 cups Quaker Oats Old Fashioned (uncooked)
1 cup cranberries
1 cup chocolate chips

Directions:
1. Heat oven to 350 degrees F. In a large bowl, beat butter and sugar until creamy.
2. Add eggs and vanilla; beat well.
3. Add combined flour, baking soda, cinnamon and salt; mix well.
4. Add oats, cranberries and chocolate chips; mix well.
5. Drop dough by rounded tablespoonfuls onto ungreased cookie sheets.
6. Bake 8 to 10 minutes or until light golden brown. Cool 1 minute on cookies sheets; remove to wire rack. Cool completely.
7. Best when served with a glass of milk (store tightly covered).

These cookies looked so delicious, we could not wait until Christmas Eve to try them out.


What desserts do you like to indulge on for Christmastime?
How many different varieties of desserts do you serve?


QuickEdit
stormieariel
2 Comments
Share :

Monday, December 22, 2014

DIY Branchlers


Last week while reading the blogs I follow, I came across Jenna Sue's 5 days of Holiday DIY's. On Day 1 she showed a tutorial for branchlers and provided free printables. I immediately printed out one of the printables and placed it above my kitchen cabinets in place of the NOEL sign. I also started storming up ideas to create the branchlers.


We Anthony and my brother-in-law, Don, recently trimmed down one of the trees in our front yard so we have had branches in our backyard for a few weeks already. The only thing I had to buy was the plaque which was only a few dollars at Wal-Mart. I did not get to get pictures of the steps because I am a horrible blogger. So I will do my best to walk you through our steps for the most part however you can also refer to Jenna Sue's tutorial which is what we followed for the foundation of the project. 

The first thing Don did was remove the the smaller branches off our main pieces to give it more of an antler look. Once he had the shape I liked, he began removing the bark by using a small knife; he also sliced the bottom using a handheld saw to have a flat surface to mount on the plaque. Don finished the branchlers off with sand paper to smooth it out and Polycrylic clear semi-gloss.

As for the plaque, we simply stained the front and back with one coat of dark walnut stain. You do not have to stain the back since no one can see it but I chose to to have a more finished look overall.


After the stain was dry, I attached a sawtooth picture hanger to the back. 


Lastly, we attached the branchlers to the plaque with regular nails using a hammer.


 I love how the branchlers look in our home and I think it was the perfect touch for Christmastime although I do plan to keep them out year round.


Have you completed any DIY projects for the holidays?
Do you have antlers out for Christmas or all year long?

QuickEdit
stormieariel
0 Comments
Share :

Wednesday, December 17, 2014

Oh Christmas Tree, Oh Christmas Tree


After showing our display holder, I decided I would show off our Christmas tree as well. Every year putting up the Christmas tree is a great reminder of God's loving mercy for us. We take this reminder a step further by hanging tags on our tree with some of the different names of God.


I must say this personalized touch is my favorite thing to put on the tree. We are able to reread these names every year and reflect on these names to understand who God is. Another personal touch to our tree is the vintage glass ornaments Babcia gifted us with last year. I love vintage and antique decor and was excited to receive all these from my grandmother.


The last personal touch to our tree is random ornaments Anthony and I pick out every year. We will go to the store and pick out an ornament each that represents us in some way.

Anthony played the saxophone in high school.
I was able to travel to London
the year before starting high school.
I love how all these pieces join together and create a meaningful tree for my hubby and I to admire and reminisce during the holidays.


Linking up with: Remodelaholic and Made in a Day 

Do you decorate a tree for Christmas?
What is your favorite decor item for the holidays?
What traditions do you and your family have?
QuickEdit
stormieariel
0 Comments
Share :

Monday, December 15, 2014

Rustic Display Holder


A few weeks after moving into our new house, we stopped by our old neighbor's house to ask them if they planned to use the pallet sitting out on their driveway (it had been sitting there for months and I was constantly keeping my eye on it). Luckily for us me, they handed it over gladly and said there were plenty more in the backyard if we wanted them. Um? Yah!!

However, we haven't gone back to get more quite yet because my garage is still filled with everything else left to unpack. Besides, I hadn't even decided, at that point, what I was going to do with the one we had.

Wall Shelf.
Wine Rack.
Herb Garden Shelf.
Raised Pallet Garden.

The list goes on; I even have a Pinterest board dedicated to pallets alone. You should totally check it out. Anywho, I finally decided what I would do with the first pallet: garage organizer to store left over wood from previous projects, lawn care equipment and the like of such things. To create that we had to remove a board and decided to remove the one that was cracked and broken. I immediately knew what I wanted to create using that broken piece of wood.


During the holidays, I plan to use my display holder to hang our stockings and afterwards I will move the holder into our closet for my necklaces. I am enjoying the look and style of our holder. I also created a smaller version with three knobs that I will be offering on my etsy shop soon (stay updated to know when to grab it!) As for now, enjoy the rest of the pictures.


How do you display your stockings?
Do you stalk your neighbors trash?
Are you a DIYer or do you prefer to purchase?


QuickEdit
stormieariel
2 Comments
Share :

Sunday, December 14, 2014

Introducing stormieariel decor...


A few years ago, I looked into hobbies that could bring in extra money. I loved dogs and was raised around breeding so I decided that was the perfect income hobby. While I will continue that hobby, it isn't a constant flow unless you have multiple dogs. We now only have two dogs, Labrador retrievers, and plan to keep it that way, at least for now. 

So, Anthony started thinking of other hobbies we can do to bring in extra money as well. He came up with quite a few but one we can enjoy together is building and creating. Which is why we set up shop (I don't really know what that means but sounded cool).

Not only will we be creating decor for our house but for your house too! If there is something you like that we created, we will be more than glad to take orders and customize it! We have already started creating a few items and some are already listed on my etsy shop. Of course, items I have created in the past can be ordered as well!
QuickEdit
stormieariel
0 Comments
Share :

Wednesday, December 10, 2014

Here and There


As many of you may already know, we bought a new house.

When we started the house hunt, I already started  thinking of all the ways I can personalize our future house to make it into our home. Once we finally knew which house was ours, my head went spinning nonstop. I even purged all my Pinterest boards pertaining to our home. I was more excited then ever to start working on our new house.

My first line of business, moving into the house, was making it livable for all of us while getting ready to host 25+ people for Thanksgiving. I was able to accomplish both things this last month and now I cannot wait to start all these other projects I have in mind.

However, Christmas is two weeks away (I am hosting Christmas Eve dinner with a gift exchange) and money is tight. All the beautiful things I would love to do and most likely would take forever for me to complete anyways is on hold at least for a little bit. I am not at all disappointed because it gives me more time to enjoy this holiday season with my hubby. We are both on break from school and he has vacation time coming up, exciting!

I also can take my time unpacking all the other boxes left in the garage (and possibly complete some smaller projects I started up and never completed).

As always, my posts will continue to be sporadic. I hope you all (if anyone) sticks with me!
QuickEdit
stormieariel
0 Comments
Share :

Friday, December 5, 2014

How to Decorate: Above the Kitchen Cabinets


In our first home, I researched for weeks on the art of decorating above the kitchen cabinets. There were many tips and tricks from so many bloggers. I kept some of those tips in mind and kind of created my own way. Now I am not an expert but I can give some advice of things I have learned along the way.

1. You do not have to buy new items, you can use things laying around the house like a basket:


2. Alternate heights of objects. I use this technique because of the varying height of our ceiling at our old house and the new house and this allows it to be more appealing to the eye and brings interest, in my opinion.

3. Layers. Certain items need to be layered to create more of a visual.


4. It takes time to make it feel right for you. This step is the hardest. You will do a lot of rearranging and it will seem endless and hopeless but once you got it right it will be magical. 

I have gone through so many arrangements for this small area:


I still am not pleased but I know it will get there eventually (and I will share my magical moment with y'all when it happens).

Most importantly, stay patient and remember to enjoy the moments turning your house into a home. There isn't a need to make everything Pinterest perfect, make your home represent you and your family not somebody else's.


Linking up with: A Life in Balance
QuickEdit
stormieariel
3 Comments
Share :

Saturday, November 29, 2014

Tabletalk


So the last you heard from me, Ant and I made the decision to attempt to build a dining table once we moved into our new house.

That time frame gave us four weeks before Thanksgiving which sounded very doable. However, due to unseen circumstances our closing date was postponed two weeks.

Once we were finally homeowners to our anticipated house, we were two weeks away from Thanksgiving and things seemed pretty hectic.

Not only did we need to focus on making things livable for all of our sake but we needed to figure out a seating arrangment since we were gonna host Thanksgiving for 25+ people asap.

Basically, we found a table similar to the one I wanted to build at a local antique store with all the details I was swooning over!


I originally wanted to place this table in the eat in kitchen however the table is a little fragile and probably wouldn't last every day use. Because of that, the table resides in the formal dining room and I cannot wait until the room is complete.

Although, my cousin and I were able to play around with tablescape ideas for Thanksgiving. 


Little progress like this makes my heart happy and excited for the next thing in store, whatever that may be!
QuickEdit
stormieariel
0 Comments
Share :

Friday, October 31, 2014

Lost Files


In honor of our first home with a few days left before our move, I figured I would share undocumented projects that were near complete. 

I showed sneak peaks of our coat closet project:


And I think I mentioned the closet remodel for the second bedroom as well. Let's start with the secondary closet.

Our remodel started due to necessity. The wire shelf crashed because of the weight of things we needed in that closet. We didn't remodel right away, we rigged it and were careful with it. However, our niece was gonna move in and would need to use the closet. We rushed and completed the project in two days. We always planned to add the finishing touches to make the shoe shelf look more built in instead of forced in but after my niece moved out, my grandmother moved in.

This is the only picture from the remodel. Bad blogger.

Still very functional and the new owners can take out the shoe shelf if they want to add another rod.

The coat closet wasn't a necessity, more of a want.

I hate those wire shelving.

Anthony and I would just throw our jackets and belts on the dining chairs. The pile kept growing but it's just a hassle to take a hanger out and put the jacket on a hanger and hang it. I thought of creating hooks instead of a rod and looked to Pinterest. I saw many people had already created it in their own homes and it made me that more excited to try it. So we did! The only thing we didn't get to do was add shelving and paint the walls. However, the coat closet still came out beautiful and functional:


And that's the last of the house projects for our first home. I am sad to say bye but I'm excited for what is ahead!

Stayed tuned for an announcement!!


Linking up with:

http://tatertotsandjello.com/2014/10/link-party-palooza-giveaway-home-made-collection.html#more-65442
QuickEdit
stormieariel
0 Comments
Share :

Thursday, October 23, 2014

Furniture Building


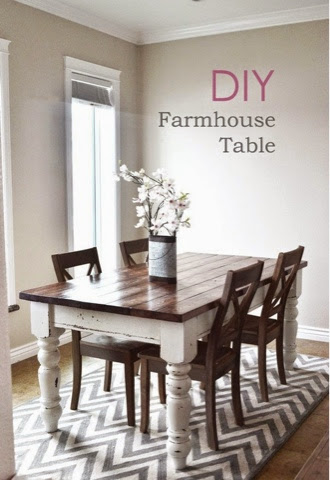
So I've been thinking like ALOT about making a dining table. The more I think about it, the more I love the idea!! I have been scanning my previous pins on Pinterest for inspiration:

http://houseandhome.com/design/photo-gallery-farmhouse-style?page=0

http://ana-white.com/2013/05/plans/husky-farmhouse-table


My ultimate inspiration came down to this one:

http://www.rivieramaison.com/page/42/Home.html

I love the curvy legs, kinda reminds me of a french provincial dresser. Gosh, what I would do to have one of those in my bedroom. Anywho, I don't think I would paint the bottom white, I would keep it all the same wood tone: dark walnut. I am even thinking of refinishing the silver chest and end table to dark walnut. The coffee table is already that stain color.

So, I have been so caught up in my vision I even hand drew my version (shows how much thought I have really put into it):


And guess what!

Anthony is fully on board!! First things first, we move into the new house; buy all the tools we need that we don't already have. Then, we will also need to order table legs:

http://www.osbornewood.com/1190.cfm


Since this is our first time building furniture, I am not confident that we could create those gorgeous curves I love which is why we are purchasing the legs. The legs will also match the silver chest, end table and coffee table in the living room which will help keep consistency. However, everything else will be handmade.  

I am so excited to start this project with my hubby!! Hopefully we survive and a beautiful piece comes out! Stay posted for updates on our move and furniture building process.

P.S. Depending on how well this project turns out, we may also build our formal dining room table as well.
QuickEdit
stormieariel
0 Comments
Share :

Follow @stormieariel